Showing posts with label treats. Show all posts

Wednesday, December 1, 2021

Silky & Creamy Easy Peasy No Bake Cheesecake


A healthier option cheesecake. I may try 1 1/2 blocks of cream cheese to lighten up the sugar. It is defiantly sweet, and the texture should not be affected & the sweet taste will still be noticed. Top with any of your favorite toppings. 

Pictured is raspberries &almonds.  


1 can (11ounces) of coconut sweetened condensed milk (or regular sweetened condensed milk)

1 - 8 ounce block of cream cheese (or 1 1/2 blocks) room temperature

1 tsp of vanilla extract

* I like to add a couple teaspoons of cinnamon to the mix. 


Directions:

Mix together and pour into prepared pie crust. (see below options) 

Chill in freezer until firm - truthfully it is better the next day so overnight is great, but a few hours works also. 

Crust options or you can crustless for a creamy dessert. 

- graham cracker crust

- pecan or walnut store bought crust


or  pecan homemade crust  (easy!) My option 


2 1/2 cups pecan flour

4 Tablespoons of melted butter

1/2 tsp of cinnamon (optional) 


Mix all ingredients together. 

Full size pie crust: press into bottom of buttered pie pan and baked 5-10 minutes on 325. Watch carefully nuts burn easy. 

                         or

Mini mason jar cheesecakes: press the mixture about 1/2 to 1 inch up  a 1/4 pint mason jar for individual servings. I find that you really do not need to bake the pecan mixture with the little jars. Top with a few spoonfulls of cheesecake mixture above. 


* HINT: The more the pecan layer the less the sugar. 


Waffle Iron Cookies - oh my!


* gluten and corn free options. See notes. 

  • 1/2 cup butter, softened
  • 1 cup sugar
  • 2 large eggs, room temperature
  • 1 teaspoon vanilla extract

  • *1-1/2 cups all-purpose flour
  • 1 teaspoon baking powder
  • 1/2 teaspoon salt
  • *Confectioners' sugar
 Gluten Free Options: 
You can sub these gluten free options:

 #1 choice Cassava flour, which acts the most like all purpose flour, ratio of 1 cup to 1 cup 

 #2 Almond flour, ration is 1 cup almond to 1/2 cup all purpose flour (this recipe would take 3 cups almond flour) 


Corn free option:
Confectioner sugar is basically fine ground sugar and cornstarch blended together.
They do sell a corn free option or you can blend your own in a blender. 
Sugar and arrowroot, tapioca .... 

1 cup sugar (I prefer unbleached but it will give you a hint of beige)
1 tablespoon of tapioca or arrowroot starch
Blend until a fine powder is formed. 
* I use a regular size mason jar on my blender- screw on blade and flip upside down- similar to a "bullet blender".   

Directions

  1. In a large bowl, cream butter and sugar until light and fluffy, 5-7 minutes. Beat in eggs and vanilla. In another bowl, whisk flour, baking powder and salt; gradually beat into creamed mixture (mixture will be thick).
  2. Drop dough in batches by tablespoonfuls 3-4 in. apart onto a greased preheated waffle iron. Bake until dark brown, 2-3 minutes.
  3. Remove to wire racks to cool completely. Sprinkle with confectioners' sugar.

Thursday, December 14, 2017

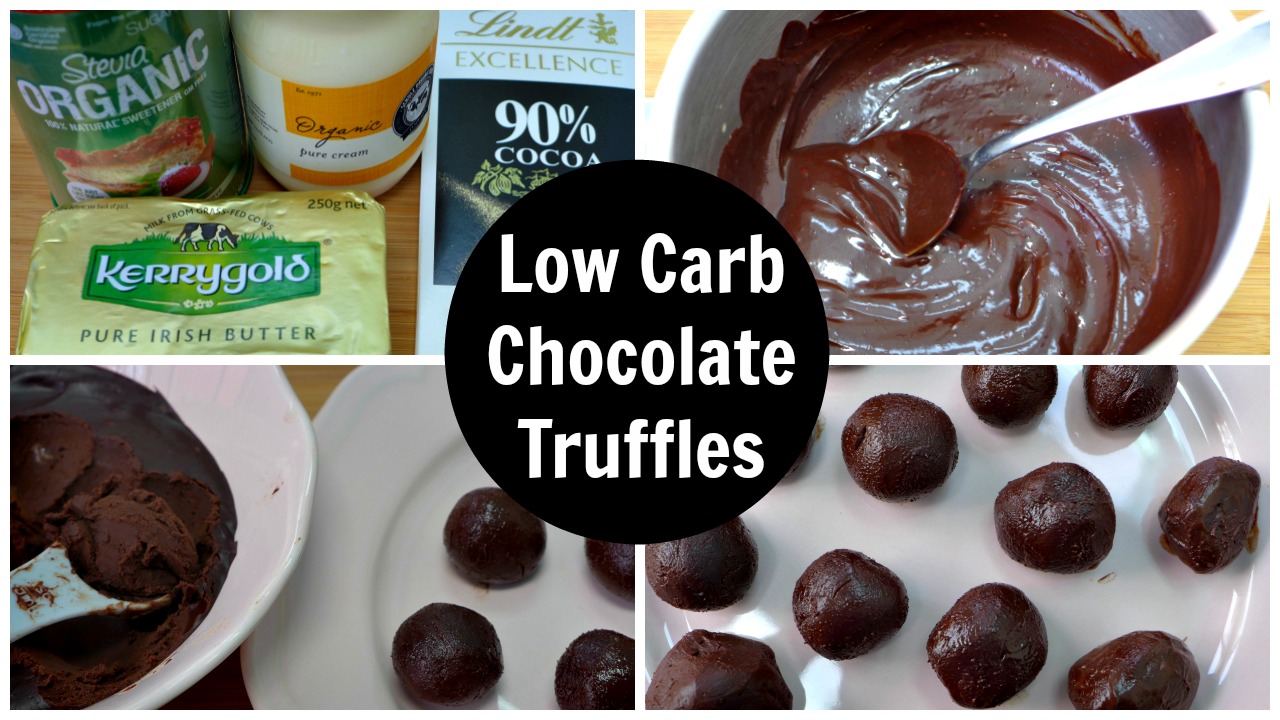
Keto Truffles – Low Carb Chocolate Truffles

Collage of making Keto Chocolate Trufffles - the low carb ingredients, mixing them together and shaping the mixture into chocolate truffles.
yummyinspirations.net/

Keto Truffles Recipe

  • 1/2 Cup Cream
  • 100g Chocolate (I used 90% Lindt)
  • 1-2 Tablespoons Sweetener of Choice, or more to taste (I used Stevia)
  • 1 Tablespoon Butter (I used salted to add flavour)
  1. Pour the cream into a small saucepan.
  2. Bring the cream up to a simmer over low heat.
  3. Remove from the heat and quickly add the chocolate, sweetener and butter.
  4. Stir quickly and gently to melt the chocolate and butter and help the sweetener dissolve.
  5. Taste a tiny amount to check it’s sweet enough to your liking, adding more sweetener and stirring it needs it.
  6. Allow to cool then refrigerate for a few hours until thickened and the mixture can easily be rolled into balls.
  7. Once the truffles mixture has thickened, remove from the fridge and roll into balls, using a teaspoon of the mixture per ball.
  8. You could leave the balls as is or dip into cacao, coconut or more melted chocolate.
  9. Keep refrigerated.
Makes 16 balls


Ice Cube Tray Chocolate Covered Cheesecake Bites With Raspberries

These delicious Chocolate Covered Cheesecake Bites with raspberries in an ice cube tray are so easy and fun!

Ingredients

  • 10 ounces semisweet chocolate (hw:dark 70% or more)
  • 8 ounces cream cheese softened
  • 1/2 cup powdered sugar (hw: homemade not store bought with corn starch)
  • 1 teaspoon vanilla
  • 1/4 cup whipped cream
  • 14 raspberries fresh or frozen

Instructions

  1. Place chocolate in a medium bowl and microwave in 30 second intervals until smooth.
  2. Take an ice cube tray (or a silicone mold), and coat each cube with chocolate. Freeze for 5 minutes; meanwhile, prepare filling.
  3. In a medium bowl, mix cream cheese, powdered sugar, vanilla until smooth. Add whipped cream.
  4. Fill each ice cube 1/4 full with cream cheese mixture. Add 1 raspberry and then cover the rest with cream cheese mix.
  5. Add melted chocolate on top and chill for 1 hour to set. Remove from fridge and invert to unmold. Serve and enjoy! 


Friday, December 1, 2017

Paleo Homemade Marshmallows


(this is an egg free, corn free,  sugar alternative :honey and/or maple syrup version)

Troubleshooter guide: 
So in order to help you along your marshmallow journey….here is a compiled list of things that I have had to troubleshoot over the years. Preparation is the best way to set yourself up for success! Once you get the process down, get cozy with your thermometer and a feel for your mixer, you will enjoy these lovely treats for a long time to come.

. Be sure to test your thermometer for accuracy. Thermometers can easily get off by getting bumped, dropped or just with regular use. Some can be calibrated, some can not. This is the case with both regular and digital thermometers.
2. Most thermometers have an optimal “fill” line, telling how much liquid you need for them to read most optimally. If your pot is too large, you may not get an actuate reading. Most often this reading is off in the direction of displaying a cooler temperature than there actually is. Conversely letting the actual bulb part of thermometer touch the bottom or sides of the pan cam also result in inaccurate readings, usually showing the syrup as hotter than it actually is. If needed, you can carefully tilt the pan for a moment so the thermometer tip is fully submerged. This can help you get a better reading.

Trouble Shooting:

1. Soft or Soggy, lacks volume
If the marshmallows are too soft, soggy, wet or lack volume after setting for 4 hours or so,  your sugar syrup may not have gotten hot enough OR you did not whip them long enough. Whipping times will vary quite a bit depending on your mixer. However you can not whip an undercooked sugar syrup enough to make it fluffy. Also, a very wet, humid day can make it hard for marshmallows set.
2. Clumpy, Seized, Stiff, Un-spreadable, Lacks Volume
If the marshmallows set too fast or you can’t spread the cream without it clumping up, or if they are dense and lack volume….your sugar syrup may have been too hot. It is also possible that just added the sugar syrup too quickly. First check to be sure that your thermometer is reading correctly. But remember, even if your thermometer is set correctly, thermometers can still give inconsistent readings if the ingredients don’t go up to the fill line.
3. Wet and Sticky Once Cooled
If the marshmallows are wet on the bottom or the on the top after setting the full four hours, then the cream was probably too hot when transferred to the pan. Also, your liquid measurements may have been off.  Try a little sprinkled starch to help reduce the stickiness. Also possible….humidity just wasn’t your friend today.
4. Gelatin Clumps in The Marshmallows
If there were gelatin clumps and hard bits in the marshmallows, then the gelatin was not fully dissolved by the sugar syrup. Be sure to let the syrup melt the gelatin in the early mixing process. If needed you can stop and stir the sugar syrup once the gelatin is added.
5. How to Check Your Thermometer For Accuracy
You can test your thermometer for accuracy by placing the tip in a pot of boiling water. If you are at sea level it should read 212 degrees F or 100 degrees C. I usually let it stand in the boiling for 5-10 minutes to give the thermometer time to catch up. Some are slower than others.
MOST IMPORTANTLY: Great candy making skills take time and practice. Just be patient and don’t expect perfection every-time. There is no such thing as a FAIL-PROOF candy recipe.
ROASTING: For best results, I use a kitchen torch for roasting the marshmallows. If using over a fire, I like to let them dry out some once the mallows have been cut. Dusting with powdered sugar or arrowroot starch will also give you the best results for roasting. If using a camp fire, stick the mallows in the hottest part of the fire so that you can roast for a shorter time than “Jet Puff” style marshmallows.
STORING: I don’t keep mine longer than 3-5 days in the fridge, but they do freeze very well, and can be kept for longer periods of time. Just bring to room temp before using.

Paleo Homemade Marshmallows

Check out the instructional video at the bottom of the post
Ingredients:
1 cup filtered water (split into half cups)
2 1/2 U.S. tablespoons powdered gelatin. 225 bloom strength, same as Knox gelatin. ( I use Vital Proteins gelatin)
1 1/4 cup organic light colored honey or maple syrup (I like half of each)
1 teaspoon vanilla extract
1/4 teaspoon salt
Optional: Arrowroot starch or tapioca starch (in place of the traditional powdered sugar) to coat the outsides of the marshmallows. You can also use organic powdered sugar or other coatings such as cocoa, coconut and cinnamon. I like 50/50 combination of arrowroot and organic powdered sugar.
Method:
1. Grease an 8×8 pan (or even a rectangular casserole dish) and line with parchment paper. Leave some length to create flaps over the sides of the pan, marshmallows are sticky. They will be used as handles for removing your finished marshmallows later. Sprinkle the parchment paper with a light layer of arrowroot starch or other coating of choice.
2. In your mixer bowl, sprinkle the gelatin evenly over 1/2 cup of water. Allow to bloom (hydrate) for about 5 minutes.
3. While the gelatin is blooming, pour the other 1/2 cup of water in a sauce pan, along with the honey/maple syrup and the salt. Turn the burner on at a medium to medium high heat. Bring the mixture to a boil (watch it though as it likes to really foam up). Place a candy thermometer in the sauce pan and continue to boil the mixture until it reaches 240-242 degrees (the soft ball stage). This usually takes 12-15 minutes (give or take) depending on how hot the burner is, size of pot and even the humidity in the air.
4. Turn the stand mixer or hand beaters on to medium. Pour the syrup mixture into the bowl in a steady stream, combining it with the softened gelatin. Avoid pouring it directly onto the beaters, or the syrup will splatter and hit you or harden in the sides of the bowl.
5. Turn the mixer up to high and continue beating until it triples in volume, becomes light in color and the marshmallow cream is just cool to the touch (this can be anywhere from 5-10 minutes depending on your mixer). Times will vary! Add the vanilla toward the end of mixing, just before you think it’s ready. If adding spices, now is the times to add those as well. When the marshmallow cream is sufficiently whipped, it will have good volume and hold its shape for a moment before falling back on itself when scooped up with the beaters.
6. Turn off the mixer and using a rubber spatula, transfer the marshmallow creme to the prepared pan. Working quickly, smooth out the top with a pallet knife or back of a spoon. Sprinkle starch evenly over the top and pat down if needed.
TIP: If you are not using a coating then lightly grease your hands with oil and pat smooth. This will help keep the marshmallow cream from sticking to your fingers. Allow to sit and “cure”anywhere from 4-6 hours. Although I have been known to cut them earlier and they are often ready. But, if you want them to look nice and clean after cutting, I do recommend waiting at least 4 hours, even if they seem set, as they will be more wet inside.
7. When set, remove the marshmallows by lifting from the parchment paper flaps. Carefully peel away from the sides, dusting with starch if needed. Cut to desired size and shapes. Add more coating while cutting if needed and toss them again in some starch once cut for a super nice finish.
Enjoy! (Ingredients and cooking times may vary slightly in this video but the process is essentially same.
There is a video on her site. 

Sunday, July 16, 2017

CAULIFLOWER Chocolate MOUSSE!

 CAULIFLOWER MOUSSE! Practically ❌no calories and packed with fiber!...yes, dreams do come true!✨I'm sure you've heard of zucchini bread &, black bean brownies, so this is no different! . Ingredients: 1 head of *cauliflower 1/2 cup unsweetened cacao powder 1/2 - 1 Tbsp *Great Lakes gelatin (red can) vegans sub agar. Sweetener of choice to taste (raw honey, stevia, etc.) . Steam cauliflower until soft. In a high speed blender, puree cauliflower, then add in remaining ingredients and puree p...

Practically ❌no calories and packed with fiber!...yes, dreams do come true!✨I'm sure you've heard of zucchini bread &, black bean brownies, so this is no different!

Heartweed: I have had zucchini bread and black bean brownies and they were both yummy.....cauliflower mousse?? 
.
Ingredients:
1 head of *cauliflower (3-4 cups) 
1/2 cup unsweetened cacao powder
1/2 - 1 Tbsp *Great Lakes gelatin (red can) vegans sub agar. (agar powder is a 1:1 ratio with gelatin) 
Sweetener of choice to taste (raw honey, stevia, etc.)
.
🍫Steam cauliflower until soft.
🍫In a high speed blender, puree cauliflower, then add in remaining ingredients and puree puree puree until silky smooth!
🍫Pour into serving cups and refrigerate at least 3 hours (can put in freezer for 20 minutes first to speed up the process).
.
NOTES
*1 med. cauliflower head contains: 147 calories, 15g fiber, & 12g of protein!
*Great Lakes gelatin contains 43 calories, 0g fat, 0g carb, 11g protein per Tbsp! AND....is only from grass fed beef👏🏻 (other brands such as Knox are from pork) 

HOMEMADE GUMMY BEAR FRUIT SNACKS

#ad This is an easy, healthy Homemade Gummy Bear Fruit Snacks recipe! It is made with only 3 ingredients: Welchs 100% Grape Juice, honey, and Gelatine!
INGREDIENTS
  • 1 cup Welch's 100% Grape Juice
  • 3 tbs Gelatin 
  • 1 tbs honey
INSTRUCTIONS

  1. Mix all ingredients in sauce pan.
  2. Cook on medium heat until ingredients are completely dissolved and mixture is runny.
  3. Using a dropper, drop gelatin mixture in candy mold.
  4. Refrigerate 2 hours before serving. 

Homemade Gummy Bears wplus milk probiotic version

Homemade Healthy Gummy Bears No Added Sugar
Heartweed- can also use juice for the fruit puree and water.

Homemade Gummy Bears with No Added Sugar
Author: 
Recipe type: lollies, gummy bears, sweets, snacks, healthy, sugarfree, dairyfree, glutenfree
Prep time:  
Cook time:  
Total time:  
Serves: 2-4
Fruit: berries of all sorts and mangoes provide the best results when making puree gummy bears at home. If using frozen fruit, ensure the puree is close to room temperature before mixing with warm gelatin. You can strain the puree to get rid of the seeds or leave them in, we quite like the texture. Liquid: you can use filtered water, coconut water or milk of your choice for the remaining liquid. For Milky version, use cow's milk or any other milk you like - we used Pure Harvest Organic Almond Milk - it really is like homemade. Things you can add: probiotic powders, protein powders, green powders, maca, etc. Always add to the cool liquid to preserve nutritional value. Moulds: if you don't have fancy-shaped moulds, pour the liquid into a baking tin lined with baking paper. Allow to set then cut into squares with a knife.
Ingredients
  • For a Fruity Version:
  • ½ cup pureed fruit (strawberry, raspberry, blueberry or mango)
  • ½ cup liquid (filtered water, coconut water or milk of your choice)
  • 1-2 tablespoons natvia (stevia granules), or honey if you prefer
  • 3 tablespoons gelatin powder (I used grass-fed gelatin) HW: AGAR powder or flakes can be substituted for VEGAN see note below 11/2 tsp of agar powder per cup of liquid 

For a Milky Version:
  • 1 cup milk of your choice (cow's, rice, oat or almond - we used Pure Harvest Organic Almond Milk)
  • 3 tablespoons powdered gelatin
  • 1 tablespoon natvia (granulated stevia), honey or sugar if you prefer
  • ¼ teaspoon vanilla powder
  • 2 capsules dairy-free probiotics powder (such as Inner Health Plus)
Things you might like to add:
  • extra probiotic powder, protein powder, vanilla powder, green powder, bee pollen, maca, fish oil, etc
Instructions
For the Fruity Gummy Bears:
  1. Place pureed fruit into a beaker for easy pouring into the moulds.
  2. In a small saucepan whisk liquid with gelatin over low heat, until dissolved. It is not recommended for the mixture to boil.
  3. Pour the gelatin liquid into the pureed fruit and whisk to prevent the gelatin from setting in clumps. Add anything else you might like and whisk to incorporate.
  4. Pour the mixture into moulds and place in the fridge for 15 or so minutes to set (if you place the moulds on top of an ice-filled tray, jellies will set quicker).
  5. Remove from moulds and store in the fridge in an air-tight container for 1-2 weeks.
For the Milky Gummy Bears:
  1. Heat ½ cup milk and gelatin in a small saucepan over low heat, whisking until the gelatin is dissolved. Remove from heat. Whisk in remaining milk, natvia, vanilla powder and probiotic mixture.
  2. Pour into moulds and place in the fridge to set for 15 minutes or so.
  3. Remove from moulds and store in an air-tight container in the fridge for 1-2 weeks.
Vegan Gummy Bears
Agar agar powder is the most common substitute for gelatin in vegetarian and vegan jelly-making. To make Vegan Gummy Bears, add 1 1/2 teaspoons agar agar powder to 1 cup liquid. Unlike gelatin, agar mixture should be brought to a boil to set, so if you are working with heat-sensitive ingredients like probiotics or vitamins, perhaps only boil half the liquid.

Note:  1 teaspoon of agar powder equals 1 TABLEspoon agar flakes 
One of the advantages of agar, apart from being plant-based, is the fact that it does not melt when stored out of the fridge which might make for better lunchbox treats.

Wednesday, July 12, 2017

Buttermints


Packed with healthy, blood-sugar-balancing fats, these Buttermints instantly stop sugar cravings and satisfy sweet tooth while filling you up for hours. You won't believe it until you try it!
INGREDIENTS
For the only-butter version
  • 1 cup butter, organic pasture butter is the healthiest! (Ghee will not work as a substitute for the butter, because it will not emulsify with the honey)
  • ⅛ - ¼ tsp. peppermint extract
  • 3 Tbs. raw honey
  • Small pinch of unrefined salt
  • Optional: 2 Tbs. cocoa powder for a chocolate version (a reader's suggestion)
For the version with coconut oil
  • ½ cup butter (pasture butter is best!)
  • ½ cup coconut oil (it should be solid, not liquid)
  • 3 Tbs. raw honey
  • ⅛ - ¼ tsp. peppermint extract, (taste and adjust amount as necessary)
For a dairy free version
  • ½ cup coconut butter
  • ½ cup coconut oil, liquified
  • 3 Tbs. raw honey
  • ¼ tsp. peppermint extract
INSTRUCTIONS
  1. Have the butter at room temperature. Stir together all ingredients and add more peppermint extract to taste, if desired.
  2. Scoop mixture into a disposable pastry bag or zip-top bag. You can use a metal pastry tip like I did, I just stuck the metal tip into the end of a zip-top bag and then cut off a corner of the bag (see picture above). If you don't want to use a tip, just snip of the corner of the bag.
  3. Squeeze bite-sized buttons onto a baking sheet lined with unbleached parchment paper. Place in the fridge until firm, about 2 hours, then transfer to a storage container and store in the fridge.
For the version with coconut oil
  1. This variation includes both butter and coconut oil. Because the coconut oil is softer than butter, it will be too soft to pipe through a pastry bag. Instead, mix together all ingredients and then spread in an even layer onto a baking sheet lined with parchment paper. The mixture will be thick enough to spread evenly and stay put.
  2. Place in the fridge until firm, about 2 hours, then cut into little squares and transfer to a storage container. Store in the fridge.
For the dairy free version
  1. Make sure the coconut butter is at room temperature - it should be stir-able. If it is solid, place the jar in a saucepan of hot water and stir until it is liquid.
  2. Combine all ingredients. Spread on a parchment-lined baking sheet as described in the coconut oil + butter version above. Alternatively, use a spoon to drop small dollops of the mixture onto a parchment-lined baking sheet. Chill until solid.


Monday, April 3, 2017

Sweet Potato Chicken Poppers (Paleo & AIP)

Sweet Potato Chicken Poppers (Paleo, AIP & Whole 30)

Ingredients
  • 1 lb ground chicken (uncooked)
  • 2 cups raw (not cooked) sweet potato, grated 
  • 2 tbsp coconut oil + 1 tsp for greasing the baking sheet
  • 2 tbsp coconut flour 
  • 2 sprigs green onion, chopped fine
  • 1/2 tsp garlic powder
  • 1/2 tsp onion powder
  • 1/2 tsp sea salt
Instructions
  1. Preheat the oven to 400 F and lightly grease a lined baking sheet with coconut oil
  2. Combine all of the ingredients in a large mixing bowl and thoroughly combine
  3. Begin rolling the mixture into small, slightly flattened poppers about one inch in diameter (you'll have about 20-22 poppers) and place them on the cooking sheet
  4. Place in the oven for 25-28 minutes, flipping half way through
  5. Crisp further in a pan or place under the broiler if desired for 1-2 minutes to crisp further
  6. Remove from the oven when thoroughly cooked through
  7. Allow to cool and serve with your favorite sauce

Make Your Own Organic Peanut Butter Cups


Image result for peanut butter chocolate cups


https://www.davidwolfe.com/3-reasons-stop-eating-peanut-butter-cups/

Heartweed: Store bought that is : I am sure in 1928 they did contain the harmful ingredients they contain now. 

Ingredients
  • 12 muffin tin liners (Hw: I love the silicon ones- the paper ones are lined with corn :0 ) 
  • 12 ounces of organic dark chocolate
  • 1 cup of organic peanut butter (hw sunbutter, cashew...)
  • 1/4 cup of raw honey 
  • 1/4 teaspoon of organic salt (hw: optional) 
Directions
  1. Using a small saucepan, melt the chocolate on low heat while stirring continually. Leave it on for 1-2 minutes and be careful not to overcook.
  2. Using a teaspoon, put chocolate portions into the muffin cups.
  3. Place the whole muffin tin into the fridge to solidify.
  4. In a medium bowl, mix the organic peanut butter, raw honey and salt.
  5. Once the chocolate in the fridge has hardened, heat the peanut butter in a small saucepan over low heat to soften it.
  6. Put a small portion of peanut butter into each of the chocolate-coated cups leaving some room at the top for another layer of chocolate.
  7. Store the cups in the fridge for 10 minutes, then spread and flatten the peanut butter.
  8. Put the cups back in the fridge for 1 hour or until the peanut butter hardens.
  9. When the peanut butter is ready, rewarm the remaining chocolate and add a layer to the top of each candy.
  10. Cool it once again in your fridge until the chocolate hardens.
  11. Enjoy!