Saturday, December 23, 2017

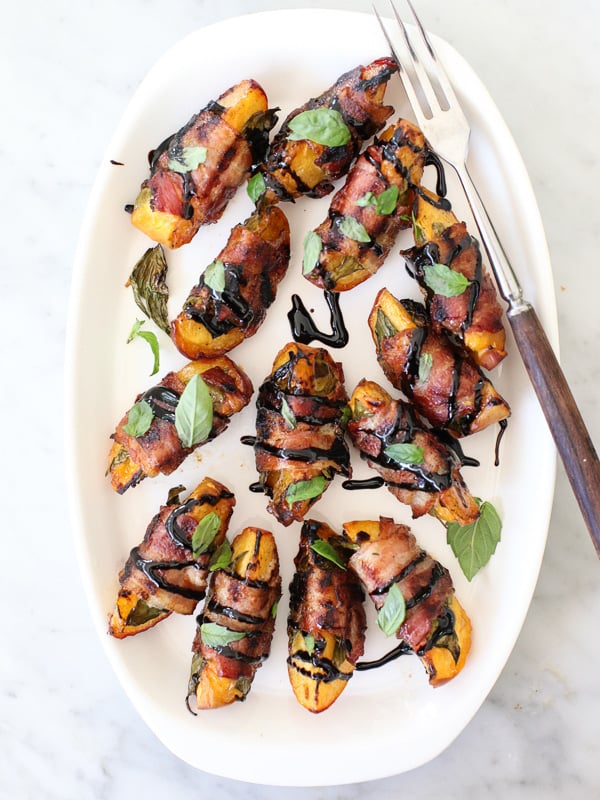
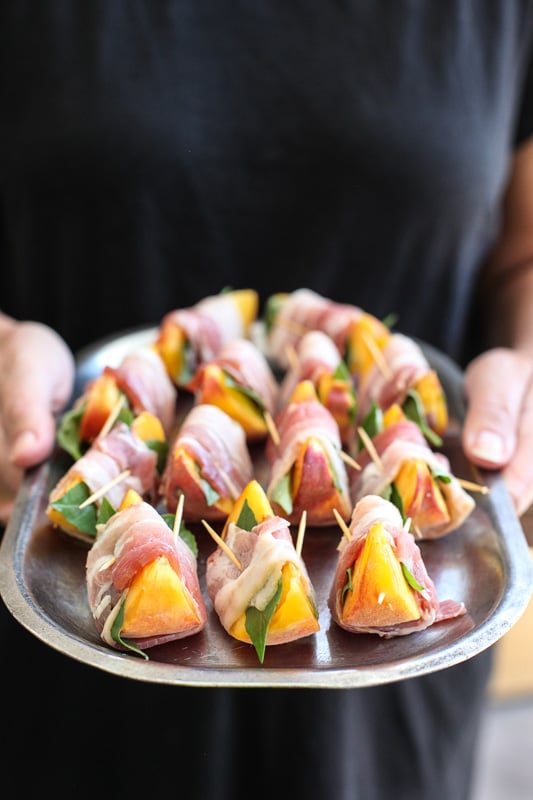
Bacon Wrapped Grilled Peaches with Balsamic Glaze

Bacon Wrapped Grilled Peaches with Balsamic Glaze #recipe on foodiecrush.comBacon Wrapped Grilled Peaches with Balsamic Glaze #recipe on foodiecrush.com

https://www.foodiecrush.com/


Ingredients
  • 4 large peaches
  • 12 ounces bacon
  • 60 large basil leaves plus more for garnish
  • olive oil
  • balsamic glaze, store-bought or homemade (see below)
Instructions
  1. Set a grill to low heat and preheat for 10 minutes or so, brush the grill grates with a paper towel dabbed in oil. I use grapeseed oil.
  2. Wash and dry peaches. Cut each peach in half and then each half into 4 quarters. Place one large basil leaf on each side of the peaches. Cut the bacon slices in half. Wrap each peach slice and basil leaves with a slice of bacon. Pin the loose end of the bacon slice with a toothpick. Repeat with remaining peaches.
  3. Brush the bacon wrapped peaches lightly with olive oil so the bacon doesn't stick to the grill. Grill the peaches until the bacon is cooked, turning so all sides are evenly cooked, about 20 minutes.
  4. Transfer to a serving platter and remove toothpicks. Drizzle with store-bought or homemade balsamic glaze.
  5. Serve hot or at room temperature.


  • 1 cup balsamic vinegar
  • ¼ cup honey
In a small saucepan, combine vinegar and honey. Bring to a boil, then reduce heat to low and simmer for about 25 minutes or until mixture has reduced by half. Raise temperature to medium-high and cook for another 5 minutes, until thickened to the consistency of syrup, whisking continuously so mixture doesn’t burn. Remove from heat 

Thursday, December 14, 2017

Savory Pizza Fat Bombs


This makes a total of 6 Pizza Fat Bombs. Each fat bomb comes out to be 101.33 Calories, 9.62g Fats, 1.69g Net Carbs, and 2.26g Protein.
The Preparation
  • 4 ounces cream cheese
  • 14 slices pepperoni
  • 8 pitted black olives
  • 2 tablespoons sun dried tomato pesto
  • 2 tablespoons chopped fresh basil
  • Salt and pepper to taste
The Execution
  1. Dice pepperoni and olives into small pieces.
  2. Mix together all of the ingredients.
  3. Form into balls, then garnish with pepperoni, basil, and olive.

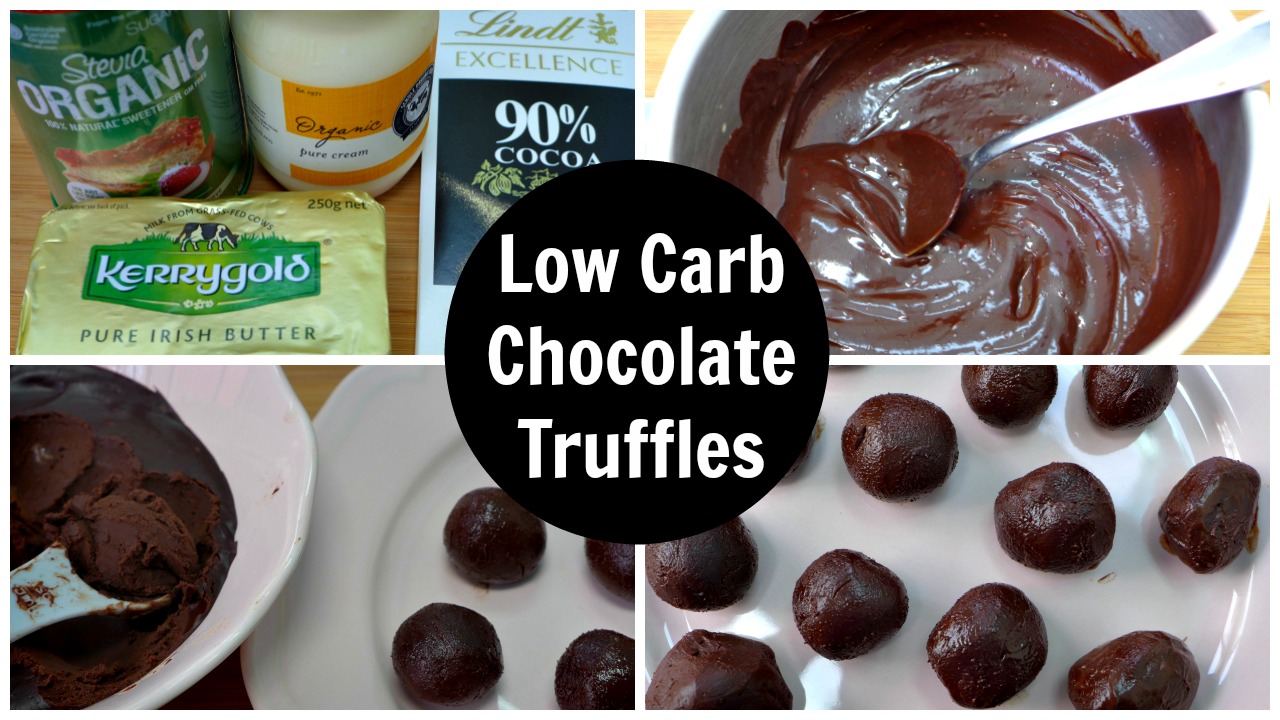
Keto Truffles – Low Carb Chocolate Truffles

Collage of making Keto Chocolate Trufffles - the low carb ingredients, mixing them together and shaping the mixture into chocolate truffles.
yummyinspirations.net/

Keto Truffles Recipe

  • 1/2 Cup Cream
  • 100g Chocolate (I used 90% Lindt)
  • 1-2 Tablespoons Sweetener of Choice, or more to taste (I used Stevia)
  • 1 Tablespoon Butter (I used salted to add flavour)
  1. Pour the cream into a small saucepan.
  2. Bring the cream up to a simmer over low heat.
  3. Remove from the heat and quickly add the chocolate, sweetener and butter.
  4. Stir quickly and gently to melt the chocolate and butter and help the sweetener dissolve.
  5. Taste a tiny amount to check it’s sweet enough to your liking, adding more sweetener and stirring it needs it.
  6. Allow to cool then refrigerate for a few hours until thickened and the mixture can easily be rolled into balls.
  7. Once the truffles mixture has thickened, remove from the fridge and roll into balls, using a teaspoon of the mixture per ball.
  8. You could leave the balls as is or dip into cacao, coconut or more melted chocolate.
  9. Keep refrigerated.
Makes 16 balls


Ice Cube Tray Chocolate Covered Cheesecake Bites With Raspberries

These delicious Chocolate Covered Cheesecake Bites with raspberries in an ice cube tray are so easy and fun!

Ingredients

  • 10 ounces semisweet chocolate (hw:dark 70% or more)
  • 8 ounces cream cheese softened
  • 1/2 cup powdered sugar (hw: homemade not store bought with corn starch)
  • 1 teaspoon vanilla
  • 1/4 cup whipped cream
  • 14 raspberries fresh or frozen

Instructions

  1. Place chocolate in a medium bowl and microwave in 30 second intervals until smooth.
  2. Take an ice cube tray (or a silicone mold), and coat each cube with chocolate. Freeze for 5 minutes; meanwhile, prepare filling.
  3. In a medium bowl, mix cream cheese, powdered sugar, vanilla until smooth. Add whipped cream.
  4. Fill each ice cube 1/4 full with cream cheese mixture. Add 1 raspberry and then cover the rest with cream cheese mix.
  5. Add melted chocolate on top and chill for 1 hour to set. Remove from fridge and invert to unmold. Serve and enjoy! 


Friday, December 1, 2017

GLuten Free Egg Rolls Wrappers

Gluten Free Egg Roll Wrappers. So easy to make and the best part is they taste the same as regular egg roll wrappers too! Perfect for wontons as well. #glutenfree


  1. By Not Too Shabby Gabby

  2. Refrigerated
    • 1 Egg
    Baking & Spices
    • 1 1/2 cups Brown rice flour
    • 1 tsp Pink himalayan sea salt
    • 2/3 cup Tapioca starch
    • 1 tsp Xanthan gum (HW: ummm alternative??)
    Liquids
    • 2/3 cup Water

  3. Mix together brown rice flour, 2/3 cup tapioca starch, xanthan gum and salt. slight beat your egg and add into your mix. Mix. Add in your water a lot at a time until the dough comes together (you will have to use your hands). You want a soft semi-sticky dough. Let it rest for about 10 minutes. Sprinkle some tapioca starch on to a counter or rolling mat. Take a golf ball size piece of dough. Roll out with a rolling pin until it is semi-translucent. Cut into a square that is 5in x 5in. You may have to roll it out a little more when you have cut the square (a pizza cutter works great). Just make sure to handle with care. They can break. The finger bowl of water is to keep the dough slightly moist (not too moist or it will be too hard to wrap). Store your gluten free egg rolls wrappers with a dusting of tapioca starch in between each sheet of dough. Store in a dry container or bag in the fridge for up to a week.
Notes
  1. If you don't want to use starch in between the egg rolls you can use parchment paper.
  2. You can also use cornstarch in place of tapioca starch at any point in the recipe.
  3. This recipe will work for wontons as well! Just cut a 3in x 3in square instead.

Paleo Homemade Marshmallows


(this is an egg free, corn free,  sugar alternative :honey and/or maple syrup version)

Troubleshooter guide: 
So in order to help you along your marshmallow journey….here is a compiled list of things that I have had to troubleshoot over the years. Preparation is the best way to set yourself up for success! Once you get the process down, get cozy with your thermometer and a feel for your mixer, you will enjoy these lovely treats for a long time to come.

. Be sure to test your thermometer for accuracy. Thermometers can easily get off by getting bumped, dropped or just with regular use. Some can be calibrated, some can not. This is the case with both regular and digital thermometers.
2. Most thermometers have an optimal “fill” line, telling how much liquid you need for them to read most optimally. If your pot is too large, you may not get an actuate reading. Most often this reading is off in the direction of displaying a cooler temperature than there actually is. Conversely letting the actual bulb part of thermometer touch the bottom or sides of the pan cam also result in inaccurate readings, usually showing the syrup as hotter than it actually is. If needed, you can carefully tilt the pan for a moment so the thermometer tip is fully submerged. This can help you get a better reading.

Trouble Shooting:

1. Soft or Soggy, lacks volume
If the marshmallows are too soft, soggy, wet or lack volume after setting for 4 hours or so,  your sugar syrup may not have gotten hot enough OR you did not whip them long enough. Whipping times will vary quite a bit depending on your mixer. However you can not whip an undercooked sugar syrup enough to make it fluffy. Also, a very wet, humid day can make it hard for marshmallows set.
2. Clumpy, Seized, Stiff, Un-spreadable, Lacks Volume
If the marshmallows set too fast or you can’t spread the cream without it clumping up, or if they are dense and lack volume….your sugar syrup may have been too hot. It is also possible that just added the sugar syrup too quickly. First check to be sure that your thermometer is reading correctly. But remember, even if your thermometer is set correctly, thermometers can still give inconsistent readings if the ingredients don’t go up to the fill line.
3. Wet and Sticky Once Cooled
If the marshmallows are wet on the bottom or the on the top after setting the full four hours, then the cream was probably too hot when transferred to the pan. Also, your liquid measurements may have been off.  Try a little sprinkled starch to help reduce the stickiness. Also possible….humidity just wasn’t your friend today.
4. Gelatin Clumps in The Marshmallows
If there were gelatin clumps and hard bits in the marshmallows, then the gelatin was not fully dissolved by the sugar syrup. Be sure to let the syrup melt the gelatin in the early mixing process. If needed you can stop and stir the sugar syrup once the gelatin is added.
5. How to Check Your Thermometer For Accuracy
You can test your thermometer for accuracy by placing the tip in a pot of boiling water. If you are at sea level it should read 212 degrees F or 100 degrees C. I usually let it stand in the boiling for 5-10 minutes to give the thermometer time to catch up. Some are slower than others.
MOST IMPORTANTLY: Great candy making skills take time and practice. Just be patient and don’t expect perfection every-time. There is no such thing as a FAIL-PROOF candy recipe.
ROASTING: For best results, I use a kitchen torch for roasting the marshmallows. If using over a fire, I like to let them dry out some once the mallows have been cut. Dusting with powdered sugar or arrowroot starch will also give you the best results for roasting. If using a camp fire, stick the mallows in the hottest part of the fire so that you can roast for a shorter time than “Jet Puff” style marshmallows.
STORING: I don’t keep mine longer than 3-5 days in the fridge, but they do freeze very well, and can be kept for longer periods of time. Just bring to room temp before using.
Paleo Homemade Marshmallows

Check out the instructional video at the bottom of the post
Ingredients:
1 cup filtered water (split into half cups)
2 1/2 U.S. tablespoons powdered gelatin. 225 bloom strength, same as Knox gelatin. ( I use Vital Proteins gelatin)
1 1/4 cup organic light colored honey or maple syrup (I like half of each)
1 teaspoon vanilla extract
1/4 teaspoon salt
Optional: Arrowroot starch or tapioca starch (in place of the traditional powdered sugar) to coat the outsides of the marshmallows. You can also use organic powdered sugar or other coatings such as cocoa, coconut and cinnamon. I like 50/50 combination of arrowroot and organic powdered sugar.
Method:
1. Grease an 8×8 pan (or even a rectangular casserole dish) and line with parchment paper. Leave some length to create flaps over the sides of the pan, marshmallows are sticky. They will be used as handles for removing your finished marshmallows later. Sprinkle the parchment paper with a light layer of arrowroot starch or other coating of choice.
2. In your mixer bowl, sprinkle the gelatin evenly over 1/2 cup of water. Allow to bloom (hydrate) for about 5 minutes.
3. While the gelatin is blooming, pour the other 1/2 cup of water in a sauce pan, along with the honey/maple syrup and the salt. Turn the burner on at a medium to medium high heat. Bring the mixture to a boil (watch it though as it likes to really foam up). Place a candy thermometer in the sauce pan and continue to boil the mixture until it reaches 240-242 degrees (the soft ball stage). This usually takes 12-15 minutes (give or take) depending on how hot the burner is, size of pot and even the humidity in the air.
4. Turn the stand mixer or hand beaters on to medium. Pour the syrup mixture into the bowl in a steady stream, combining it with the softened gelatin. Avoid pouring it directly onto the beaters, or the syrup will splatter and hit you or harden in the sides of the bowl.
5. Turn the mixer up to high and continue beating until it triples in volume, becomes light in color and the marshmallow cream is just cool to the touch (this can be anywhere from 5-10 minutes depending on your mixer). Times will vary! Add the vanilla toward the end of mixing, just before you think it’s ready. If adding spices, now is the times to add those as well. When the marshmallow cream is sufficiently whipped, it will have good volume and hold its shape for a moment before falling back on itself when scooped up with the beaters.
6. Turn off the mixer and using a rubber spatula, transfer the marshmallow creme to the prepared pan. Working quickly, smooth out the top with a pallet knife or back of a spoon. Sprinkle starch evenly over the top and pat down if needed.
TIP: If you are not using a coating then lightly grease your hands with oil and pat smooth. This will help keep the marshmallow cream from sticking to your fingers. Allow to sit and “cure”anywhere from 4-6 hours. Although I have been known to cut them earlier and they are often ready. But, if you want them to look nice and clean after cutting, I do recommend waiting at least 4 hours, even if they seem set, as they will be more wet inside.
7. When set, remove the marshmallows by lifting from the parchment paper flaps. Carefully peel away from the sides, dusting with starch if needed. Cut to desired size and shapes. Add more coating while cutting if needed and toss them again in some starch once cut for a super nice finish.
Enjoy! (Ingredients and cooking times may vary slightly in this video but the process is essentially same.
There is a video on her site. 

Sunday, July 23, 2017

Zucchini Tots


Low Carb Zucchini Tots
http://www.theneighborhoodmoms.com
2 cups grated zucchini (1 large)
1/2 small onion, minced
1/2 cup shredded sharp cheddar
1/2 cup grated parmesan
2 eggs
1 tsp garlic powder
salt & pepper
Preheat oven to 400 (Hw: I have a gas oven and this would be too high -350 for me) 
Grate the zucchini and squeeze out as much water as you can.  It’s surprisingly a pretty watery veggie.  The more water you get out, the crisper your tots will be.  Use a tea towel, or paper towels to squish and absorb the water.
Add all ingredients into a large bowl.  Stir well. Fill the mini muffin tin with the mixture, and bake for 15-20 mins or until the tops have turned golden. 
Serve with sour cream, ranch, or ketchup

Thursday, July 20, 2017

Garlic, Egg White and Oats Pizza

Picture
Ingredients:
  • 1 cup old fashioned oats 
  • 2/3 cup egg whites
  • 1/2 cup water
  • 1 tbsp flour
  • 1 tsp garlic salt
  • 1 tbsp garlic paste
  • Pizza sauce & toppings of choice 
    • For the pizza pictured I used pizza sauce, shredded low fat Italian blend, fat free Ricotta, and turkey pepperoni!
PicturePicture


Directions:
  • Preheat oven to 400'. 
  • Mix oats, egg whites, water, flour, garlic salt, and garlic paste in a bowl. Blend until smooth using a hand blender. If you don't have a hand blender use a food processor or blender. 
  • Spray cooking spray in a large skillet to reduce any of the egg white mix sticking to the pan and pour the mix in to the skillet. 
  • All to cook for about 5 minutes over medium heat until edges start to brown and mixture is pretty set into the crust form. 
  • GENTLY flip over in the pan and cook the other side for about 2-3 minutes. 
    • TIP: Use a couple of spatulas. Or if you really don't feel comfortable flipping it slide it onto a plate or cutting board, remove pan from burner for a second and hold carefully by the handle over the plate and flip that way. However you feel most comfortable doing it! The crust is fairly solid but you need to be careful. 
    • Spray nonstick spray onto a baking pan and slide crust from skillet onto the pan. 
    • Add sauce and all desired toppings
    • Bake 10 minutes until cheese is melted and edges of the crust are slightly browned. 
    • Serve up and enjoy!


Jalapeno Popper Cauliflower

jalapeno popper cauliflower casserole low carb and gluten free

INGREDIENTS

  • For the puree:
  • 1 head of cauliflower
  • 2 Tbsp heavy cream
  • 1 Tbsp butter
  • 1/4 cup sharp cheddar cheese, shredded
  • 1 Tbsp raw jalapenos, chopped
  • 1/4 tsp garlic powder
  • salt and pepper to taste

For the cream cheese layer:

  • 6 oz cream cheese, softened
  • 1/2 cup shredded cheddar cheese
  • 1/4 cup salsa verde

For the topping:

  • 3/4 cup colby jack cheese, shredded
  • 1/4 cup raw jalapenos, sliced (seeds removed)

INSTRUCTIONS

  1. For the puree:
  2. Clean and trim the cauliflower, breaking it into medium sized pieces. Place in a microwave safe bowl with 2 Tbsp of cream and 1 Tbsp of butter. Microwave, uncovered, on high for 10 minutes. Stir to coat cauliflower with cream/butter mixture. Microwave for another six – eight minutes on high (or until cauliflower is tender). Remove from the microwave and put into a high speed blender or food processor along with the cheese, jalapenos, and garlic powder. Puree until smooth (or you can leave it chunky if you prefer. Season generously with salt and pepper to taste.

For the cream cheese layer:

  1. Put the cream cheese in a microwave safe bowl and nuke for 30 seconds to soften.  (Hw : I do not "nuke") Add the shredded cheese and salsa verde, mixing thoroughly. It should be very spreadable – if not, nuke for a few more seconds.

To assemble the casserole:

  1. In a medium-sized oven proof dish (approximately 8 x 8), spread out a thick layer of cauliflower puree. Spread the warm cream cheese mixture on top of the puree. Top with a layer of shredded colby jack cheese, and sliced jalapenos. Bake at 375 degrees for about 20 minutes, or until the cheese is completely melted. You can finish it under the broiler for a couple of minutes to brown further if you’d like. . Serve hot.
  2. Optional – top with cooked, crumbled bacon before serving


Green Chicken Enchilada casserole

A low carb green chicken enchilada cauliflower casserole that is to die for! Super easy to throw together it's also low carb and gluten free!


Pepperoni Pizza Cauiliflower

pepperoni pizza cauliflower puree

http://www.ibreatheimhungry.com


This keto pepperoni pizza cauliflower casserole is easy and economical to make, and it tastes so good that even picky kids and husbands will be won over!  Low carb, gluten free, nut free, egg free.
  • Author: 
  • Yield: 4 servings
  • Category: Main Dish

INGREDIENTS

For the Puree

  • 1 medium head of cauliflower
  • 2 Tbsp Heavy Cream
  • 1 Tbsp Butter
  • 8 slices pepperoni
  • 1/4 cup shredded mozzarella cheese
  • salt and pepper to taste

For the Casserole

  • 12 slices pepperoni
  • 1/2 cup shredded mozzarella cheese

INSTRUCTIONS

For the Puree

  1. Clean and trim the cauliflower, breaking it into medium sized pieces.
  2. Place in a microwave safe bowl with 2 Tbsp of cream and 1 Tbsp of butter.
  3. Microwave, uncovered, on high for 10 minutes.
  4. Stir to coat cauliflower with cream/butter mixture.
  5. Microwave for another six minutes on high (or until tender.)
  6. Remove from the microwave and put into a high speed blender or food processor along with the 8 slices of pepperoni and 1/4 cup mozzarella cheese.
  7. Puree until smooth.
  8. Season with salt and pepper to taste.
  9. You can adjust the cream and butter to your preference for consistency.

For the Casserole

  1. Spread the cauliflower puree into an 8 x 8 oven proof casserole dish.
  2. Cover with 1/2 cup shredded mozzarella cheese, and layer with pepperoni.
  3. Bake at 375 degrees (F) for about 20 minutes.
  4. Alternatively you could microwave this for 5 minutes.
  5. Serve hot.

Herb Salmon with Cherry Relish and Cherry Apple Salad

Herb Salmon with Cherry Relish and Cherry Apple Salad

http://www.publix.com

Ingredients

2 salmon fillets, skin removed (5–6 oz each)
Large zip-top bag
1 tablespoon fresh basil, finely chopped
2 teaspoons fresh thyme, finely chopped, divided
2 teaspoons chipotle roasted garlic seasoning, divided
3 teaspoons extra-virgin olive oil, divided
1 cup fresh cherries, pitted
1 teaspoon minced garlic
1 teaspoon red wine vinegar
2 teaspoons sugar

Steps

  1. Place salmon in bag. Chop herbs finely; combine basil, 1 teaspoon thyme, 1 teaspoon seasoning, and 2 teaspoons oil. Place herb mixture in bag with salmon. Seal bag and knead lightly to coat fillets.
  2. Preheat grill. Pit cherries and chop roughly. Preheat small saucepan on medium 1–2 minutes. Place garlic and remaining 1 teaspoon oil in pan; cook 1–2 minutes or until fragrant. Stir in cherries, vinegar, sugar, remaining 1 teaspoon seasoning, and 1 teaspoon thyme; cook relish 3–4 minutes or until thickened.
  3. Place salmon on grill; cook 3–4 minutes on each side and until 145°F. Serve salmon topped with relish.

 Cherry Apple Salad

Ingredients

1 cup fresh cherries, pitted
1 apple (such as Red Delicious, Honeycrisp, or Fuji), cored and chopped
2 cups coleslaw mix
2 tablespoons lemon dressing

Steps

  1. Pit cherries and chop coarsely. Core and chop apple.
  2. Place all ingredients in medium bowl; toss until blended. Chill 15 minutes or until ready to serve.